

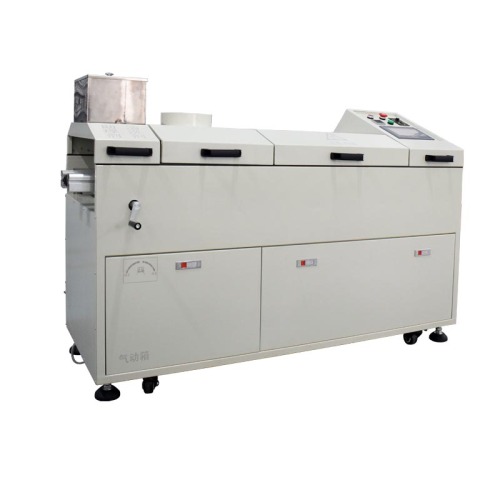
High quality full-auto sprayer
- Transportation:
- Ocean
- Port:
- Yantian Port, Shenzhen
Your message must be between 20 to 2000 characters
Contact Now| Place of Origin: | China |
|---|---|
| Productivity: | 300 units/year |
| Supply Ability: | Sufficient supply |
| HS Code: | 8515190010 |
| Transportation: | Ocean |
| Port: | Yantian Port, Shenzhen |
High-quality full-auto sprayer
|
Model: MJ-ZDPW300-R500 |
Spray range: 200-400mm adjustable |
|
Power supply: 220V 50HZ |
Dimensions: 1500* 600* 1180mm |
|
Flux capacity: Max5.2L |
Spray method: stepper motor + ST-6 nozzle |
|
Rail parallelism: 0.5mm |
Air source: 4-7KG/CM2 12.5L/Min |
|
Nozzle height: 50-200mm adjustable |
Maximum flow rate of nozzle: 60ml/min |
|
Extended preheating zone: 500mm |
Transmission speed deviation range: within 0-10mm/min |

product details
Open design
Easy to observe the working conditions and spraying effect
Easy to repair and clean up
Controller
Using touch screen and PLC combined control
Spray area
Smart induction products spray flux
The nozzle can be automatically adjusted according to the width of the product
Save Flux No-Clean Board
heating equipment
With 500mm long heating zone
Improve flux activity to eliminate moisture
Prevent the surface of the fried tin plate from being clean and the soldering effect is good
Automatic product delivery
The front can be connected to the automatic plug-in line
The back can be used for butt wave soldering
Photoelectric sensor
The outlet is equipped with photoelectric sensor
When the product arrives at the exit, the machine stops working
Return to work after taking it away
Exhaust hood
Used to store and recycle flux
Easy to backwash
Water tank
With a foot switch
Fast and sensitive to improve work efficiency
Common faults and maintenance
Flux sprayer
①When the light of the emergency stop switch is on (turns yellow)
It means that the emergency stop switch has been pressed, and the emergency stop switch needs to be turned up during work, but it is found that both emergency stop switches are in the up state. On the side, the emergency stop switch is broken and the emergency stop switch needs to be replaced.
②The photoelectric light on the board is not on
When the product is above the sensor, the light needs to be on to be normal, but if it is found not to light, it means that the sensor is broken and you need to replace the photoelectric
③The U-shaped photoelectric light does not flash (it is not normal for it to be off or on)
During normal chain transmission, this light will flash--flashing, but when the chain is rotating, the light does not flash (normally off or always on is not normal), check if the U-shaped photoelectric plug is loose, if not loose You need to replace this sensor
④No spray and no chain transmission
Detect whether there is an alarm signal, if there is an alarm that is released, if there is no alarm, check whether the emergency stop switch is pressed, if it is pressed, turn the emergency stop switch clockwise to bounce the emergency stop switch
⑤Chain drive but no spray and the nozzle does not swing
1. Check whether the switch on the main page is turned on
2. Check if there is any signal output when the product is on the top of the board photoelectric
3. Check whether the U-shaped photoelectric flickers normally
4. Check that the spray sensor is not in the initial position (close to the proximity switch in front of the machine)
⑥ The nozzle swings and does not spray flux or jet
Spray solenoid valve failure
⑦The nozzle swings and the jet does not spray water
Check the external air pressure (less than 0.6, no jetting), whether the nozzle is clogged, and clean the nozzle
⑧ Instructions for use
1. Turn on the power switch and the power indicator light is on, indicating that it is working normally
2. Connect the trachea and adjust the air pressure (approximately 0.6 scale)
3. Pour the flux into the container, and the height of the liquid level is about two-thirds.
4. Put the product on the guide rail and adjust the use of the guide rail
5. Click on the touch screen to open the chain and spray system
6. The circuit board can be automatically sprayed with flux in the sprayer
7. If there is a problem during the process of flux spraying, please press the emergency stop switch immediately, after handling it, please turn the emergency stop switch clockwise to continue the flux spraying work
⑨Equipment maintenance
1. Every day, after the work is finished, be sure to clean the flux spray area and nozzles to keep the inside and outside of the machine dry for a long time.
net
2. Regularly clean the transmission chain to prevent the flux from sticking to the chain and cause the transmission to fail. Method: First open the (Maintenance Mode) on the main page, turn the chain, and use a brush with alcohol to brush the chain continuously, and brush it for at least 5 minutes on one side
3. Regularly lubricate the motor and the screw rod to improve the life and reduce the noise


Workshop shots

Item display

About delivery
All the equipment of the company includes freight and distribution fees, excluding the cost of going upstairs, depending on the distance, choose logistics consignment or door-to-door delivery
On-site installation and commissioning
The company is responsible for distribution, and there are professional engineers on-site installation, commissioning, training, or guidance and assistance through remote video or telephone
1 year warranty
After-sales promises that all parts of the wave soldering machine are guaranteed for one year, except for human problems
Lifetime service
The company provides life-long maintenance, paid service, only labor costs and material costs
Preparation before installation and commissioning
1. Door-to-door time: within 2 working days after all the following work is ready, special circumstances will be discussed separately
2. Logistics transportation: After receiving the goods, customers who choose logistics transportation must first place the equipment and prepare all the following materials
3. Home delivery: Customers who choose home delivery need to reserve space in advance to prevent equipment and prepare all the following materials
Material preparation:
1. Power connection: lead the power cord to the device according to the requirements of the device, leaving a length of more than 3 meters to connect to the device
2. Air connection: If there is an air source in the workshop, lead the air pipe to the side of the equipment, leaving a length of more than 3 meters to connect to the equipment. If there is no air source in the workshop, you need to prepare the air compressor in advance and prepare the necessary accessories
3. Tin bar: Prepare enough tin bars in advance according to the tin capacity requirements of the equipment, so that the master can directly melt the tin for on-site trial welding test and training when he comes to the door.
4. Flux: the flux that needs to be used when the product is ready for trial welding. At least 2 liters required for testing
5. Cleaning agent: the nozzle used to clean the flux, temporarily not used, it will not affect the debugging


Related Keywords


