
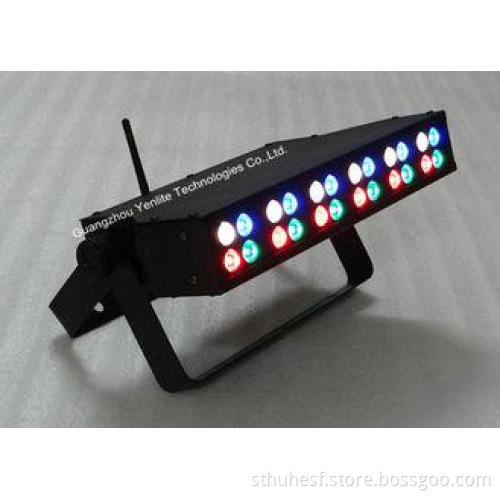
30 Degree DMX LED Stage Light Of Red / Green / Blue / White
- Min. Order:
- 1
- Min. Order:
- 1
- Delivery Time:
- 30 Days
Your message must be between 20 to 2000 characters
Contact Now| Place of Origin: | China |
|---|
30 Degree DMX LED Stage Light Of Red / Green / Blu / White LED Lighting
Quick Detail:
6 1W Red, 6 1W Green, 6 1W Blue, 6 1W White
Built-in Li-ion battery for 6 -18h of operation
Wireless DMX, Auto, Manual, Sound
CE, RoHS
Specifications:
|
Model Name: |
6 1W Red, 6 1W Green, 6 1W Blue, 6 1W White Battery Powered Wireless DMX LED Par Light |
|
Model No.: |
YL-LED-24-1RGBW |
|
Working Voltage: |
100-240V AC 50-60Hz |
|
Light Source: |
6 1W Red, 6 1W Green, 6 1W Blue, 6 1W White |
|
Max. Power: |
45 W |
|
Beam Angle: |
30 degree |
|
Battery: |
Built-in Li-ion battery for 6 -18h of operation |
|
DMX Channels: |
Mode A: 24 CH Mode B: 7 CH |
|
Control mode: |
Wireless DMX, Auto, Manual, Sound |
|
Certification |
CE, RoHS |
|
Dimensions: |
46cm X 12cm X34cm |
|
Net Weight:: |
4.5Kg |
Working Mode:
DmxMode ---To receive data from DMX controller or Master unit.
AutoMode --- The unit will automatically chase through the different colors (18 effects ).
MaulMode --- The unit will work manually as desired.
SoudMode --- The unit will react to sound, chasing through the built in programs.
WIRELES ID SETUPS --- To set wireless ID.
Button and LED indicators positions:
High power individual controllable LED, using 4 buttons and LCD display for operation menu.
Press ESC to get back to last menu.
Press ENTER to get into function menu.
Press Down, UP to edit current parameter.
Note:
When to receive wireless dmx signal, through WIRELESS ID SETUPS, you can set ID code, when
the color of the ID indicators from both transmitting and receiving ends are the same, the
communication is setup successfully.
Wireless ID setup
Press SETUP, UP OR DOWN at present mode to display current ID, press again to setup new ID, ID value will be added 1 more by pressing one time, ID indicator color will change according one by one.
Working Status:
- LED constant light: Showing current ID, no DMX or wireless signal
- RED LED flash: Transmitting
- Green LED flash: Receiving
ID code and LED color corresponding relationship:
- 1:RED
- 2:GREEN
- 3:RED+GREED---------------Yellow
- 4:BLUE
- 5:RED+BLUE------------------Purple
- 6:GREEN+BLUE--------------Cyan
- 7:RED+GREED+BLUE------White
Slave Setup
Any working modes under DmxMode can be Slave mode, if choose slave mode, its output is the same as that of the Master Unit.
DMX Control Channels Table (DMX Mode 0)
|
DMX CH |
Function |
DMX512 Value |
Descriptions |
|
CH1 |
Red Dimming |
0~255 |
Red Dimming 0% - 100% |
|
CH2 |
Green Dimming |
0~255 |
Green Dimming 0% - 100% |
|
CH3 |
Blue Dimming |
0~255 |
Blue Dimming 0% - 100% |
|
CH4 |
White Dimming |
0~255 |
White Dimming 0% - 100% |
|
CH5 |
Overall Dimming |
0~255 |
Overall Dimming 0% - 100% |
|
CH6 |
Strobe Speed Adjusting |
0~255 |
0~9: No Strobe 11~255: Strobe Speed from fast to slow |
DMX Control Channels Table (DMX Mode 1)
|
DMX CH |
Function |
DMX512 Value |
Descriptions |
|
CH1 |
Red Dimming |
0~255 |
Red Dimming 0% - 100% |
|
CH2 |
Green Dimming |
0~255 |
Green Dimming 0% - 100% |
|
CH3 |
Blue Dimming |
0~255 |
Blue Dimming 0% - 100% |
|
CH4 |
White Dimming |
0~255 |
White Dimming 0% - 100% |
|
CH5 |
Red Dimming |
0~255 |
Red Dimming 0% - 100% |
|
CH6 |
Green Dimming |
0~255 |
Green Dimming 0% - 100% |
|
CH7 |
Blue Dimming |
0~255 |
Blue Dimming 0% - 100% |
|
CH8 |
White Dimming |
0~255 |
White Dimming 0% - 100% |
|
CH9 |
Red Dimming |
0~255 |
Red Dimming 0% - 100% |
|
CH10 |
Green Dimming |
0~255 |
Green Dimming 0% - 100% |
|
CH11 |
Blue Dimming |
0~255 |
Blue Dimming 0% - 100% |
|
CH12 |
White Dimming |
0~255 |
White Dimming 0% - 100% |
|
CH13 |
Overall Dimming |
0~255 |
Overall Dimming 0% - 100% |
|
CH14 |
Strobe Speed Adjusting |
0~255 |
0~9: No Strobe 11~255: Strobe Speed from fast to slow |
DMX Control Channels Table (DMX Control Mode 2)
|
DMX CH |
Function |
DMX512 Value |
Descriptions |
|
CH1 |
Red Dimming |
0~255 |
Red Dimming 0% - 100% |
|
CH2 |
Green Dimming |
0~255 |
Green Dimming 0% - 100% |
|
CH3 |
Blue Dimming |
0~255 |
Blue Dimming 0% - 100% |
|
CH4 |
White Dimming |
0~255 |
White Dimming 0% - 100% |
|
CH5 |
Red Dimming |
0~255 |
Red Dimming 0% - 100% |
|
CH6 |
Green Dimming |
0~255 |
Green Dimming 0% - 100% |
|
CH7 |
Blue Dimming |
0~255 |
Blue Dimming 0% - 100% |
|
CH8 |
White Dimming |
0~255 |
White Dimming 0% - 100% |
|
CH9 |
Red Dimming |
0~255 |
Red Dimming 0% - 100% |
|
CH10 |
Green Dimming |
0~255 |
Green Dimming 0% - 100% |
|
CH11 |
Blue Dimming |
0~255 |
Blue Dimming 0% - 100% |
|
CH12 |
White Dimming |
0~255 |
White Dimming 0% - 100% |
|
CH13 |
Red Dimming |
0~255 |
Red Dimming 0% - 100% |
|
CH14 |
Green Dimming |
0~255 |
Green Dimming 0% - 100% |
|
CH15 |
Blue Dimming |
0~255 |
Blue Dimming 0% - 100% |
|
CH16 |
White Dimming |
0~255 |
White Dimming 0% - 100% |
|
CH17 |
Red Dimming |
0~255 |
Red Dimming 0% - 100% |
|
CH18 |
Green Dimming |
0~255 |
Green Dimming 0% - 100% |
|
CH19 |
Blue Dimming |
0~255 |
Blue Dimming 0% - 100% |
|
CH20 |
White Dimming |
0~255 |
White Dimming 0% - 100% |
|
CH21 |
Red Dimming |
0~255 |
Red Dimming 0% - 100% |
|
CH22 |
Green Dimming |
0~255 |
Green Dimming 0% - 100% |
|
CH23 |
Blue Dimming |
0~255 |
Blue Dimming 0% - 100% |
|
CH24 |
White Dimming |
0~255 |
White Dimming 0% - 100% |
|
CH25 |
Overall Dimming |
0~255 |
Overall Dimming 0% - 100% |
|
CH26 |
Strobe Speed Adjusting |
0~255 |
0~9: No Strobe 11~255: Strobe Speed from fast to slow |
Operation Instructions
General Operation
Setup Mode: Setup working mode as per the real situation of the client. If it is DMX mode, the DMX address of the unit should be set as well.
Control cable connection: Connect DMX control cable and the DMX controller, if it is one unit, no cable is required.
Connect to power: The system will run the previous saved working mode.
If in DMX mode, you can use DMX controller to edit and control programme effects. If in Auto mode, then the unit will run built-in programmes. If in AaulMode, then you can change all parameters when in Red, Green, Blue and White modes.
Individual Mode
In Individual Mode --- Auto mode or Manual Mode or Sound Mode, no controller and cable required,
running the built-in programmes inside auto or manual or sound modes.
Setup working modes, like AutoMode, and setup the parameter of Sped, MaulMode, SoudMode.
Connect to power, system will run the previous saved working mode.
If in SoudMode, running programmes as per outside heavy or light sound, if in AutoMode, then running built-in programmes, if in MaulMode, then you can choose all kinds of effects manually.
Master/Slave Mode
Master/Slave mode --- Auto or Manual or Sound modes, no controller required, when running the
programmes of auto or manual modes, master unit controls salve unit to achieve synchronizing effects.
Setup working modes, like AutoMode, and setup the parameter of Sped, MaulMode, SoudMode.
Cable connecting: Use XLR-XLR control cable to connect the input connection of the first salve unit from
the DMX output connection of the master unit, then connect the input connection of the second slave unit
from the DMX output of the first slave unit, and so on, until all salve units are connected.
When there is no control cable, the units can communicate with each other via wireless, the
preconditions are the ID codes of the master unit and the slave unit should be the same.
Connect to power, system will run the previous saved working mode.
If in SoudMode, running programmes as per outside heavy or light sound, if in AutoMode, then running built-in programmes, if in MaulMode, then you can choose all kinds of effects manually.
Note: If there are more than one master unit or connecting with DMX512 controller, the slave units will work improperly.
Connecting Diagram of Master/Slave Mode
DMX mode
DMX mode, international standard DMX512 controller is required to use for control.
Setup the working mode: DMXMode
Cable connecting: Use XLR-XLR control cable to connect the input connection of the first salve unit from
the DMX output connection of the master unit, then connect the input connection of the second slave unit
from the DMX output of the first slave unit, and so on, until all salve units are connected.
When there is no control cable, the units can communicate with each other via wireless, the
preconditions are the ID codes of the master unit and the slave unit should be the same.
Connect to power, system will run the previous saved working mode.
Use controller to control.
Connecting Diagram of DMX mode


